Adding images to illustrate your text greatly contributes to the appeal of your web pages. With Antechinus JavaScript Editor you can insert images with the same ease regardless of whether you are coding or using Visual Web Designer.
|
Please not that while JavaScript Editor can preview images in a number of different formats, Web browsers commonly support only gif, jpg, and png. If your images are in a different format, convert them into a browser-supported format using Animator Professional, or some other imaging tool. We recommend Animator Professional because it supports a huge number of formats, and allows you to batch-convert multiple images in one go.
To insert an image into your web page:
 Make sure that your web page is saved before you start inserting images. This is important because the links to images and other resources are relative to your document's path. Make sure that your web page is saved before you start inserting images. This is important because the links to images and other resources are relative to your document's path.
Select Insert / Image/Animated gif from the menu (or press Shift+F12)
When the Select Image File dialog opens, select your image and click OK
If your image is not in your document's folder (or one of its sub-folders), the Resource Wizard dialog will pop up. Deciding where your document is going to be located is important, so click here if you have not used the Resource Wizard before.
Next, the Insert Image dialog appears to allow you to specify additional options before inserting the image.
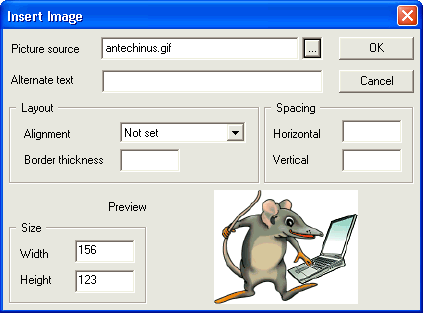
 Click on the Click on the  button if you wish to select another image. button if you wish to select another image.
Alternate text is the text that appears instead of the image if the browser does not support images. While all modern browsers support images, it is still important to specify the alternate text.
Why? Some search engines use this information for better indexing of your pages. Additionally, Internet Explorer and other browsers display this text (in a small yellow tooltip box) when your mouse is over the image.
Layout and Spacing are used to position the image in relation to other elements on your web page.
If your page has plenty of resources, it may take some time to load, especially if your visitors have a slow Internet connection. Specifying the image size helps the browser render the page before all of the images have been loaded by reserving the space for it. Without this information, your page will be reformatted each time a new image is loaded, which is not pleasing for the eye.
JavaScript Editor automatically calculates the size of the image and fills in the Width and Height fields. Modify these values only if you wish to resize the image to a specific size.
|
