 Do you need a ready-to-use slide show? Do you need a ready-to-use slide show?
Pull-down menu?
Redirection?
Rounded corners?
JavaScript Editor offers numerous and well-categorized solutions you can use instantly with only few clicks.
|
 To insert a ready-to-use solution into your page, select Insert / Solution from the menu: To insert a ready-to-use solution into your page, select Insert / Solution from the menu:
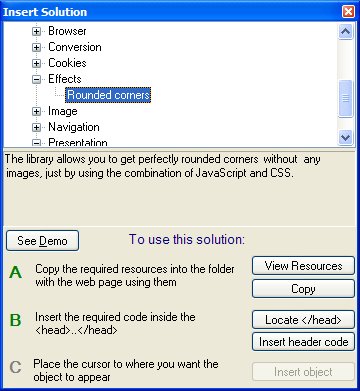
Most of the solutions come up with a demo - use it to find out the best solutions for your needs. Furthermore, having a quick look at the source code of an example is often all you need to be able to use the solution.
Please note that you can insert some of the ready-to-use objects directly into your code. The more complex ones may need one or more extra files to function.
Using any solution requires 3 steps at most (and usually only one or two - the steps that are not required for the selected object will be disabled):
A - Copying the required files into the folder of the web page using them
The View Resources button opens the folder containing the required files, allowing you to examine them.
The Copy button places all the required files into the folder with the page using them.
B - Inserting the code between the <head> .. </head> tags
The Locate </head> button places the cursor between the <head> .. </head> tags, allowing you to move onto the next step, which is clicking on the Insert header code button.
C - Inserting the copy into the body of the page.
Place the cursor in the body of the page at the place where you want the object to appear, and click on the Insert object button.
If using a particular solution requires additional instructions, you'll find them displayed in the Insert Solution dialog, or as part of the Demo. |
